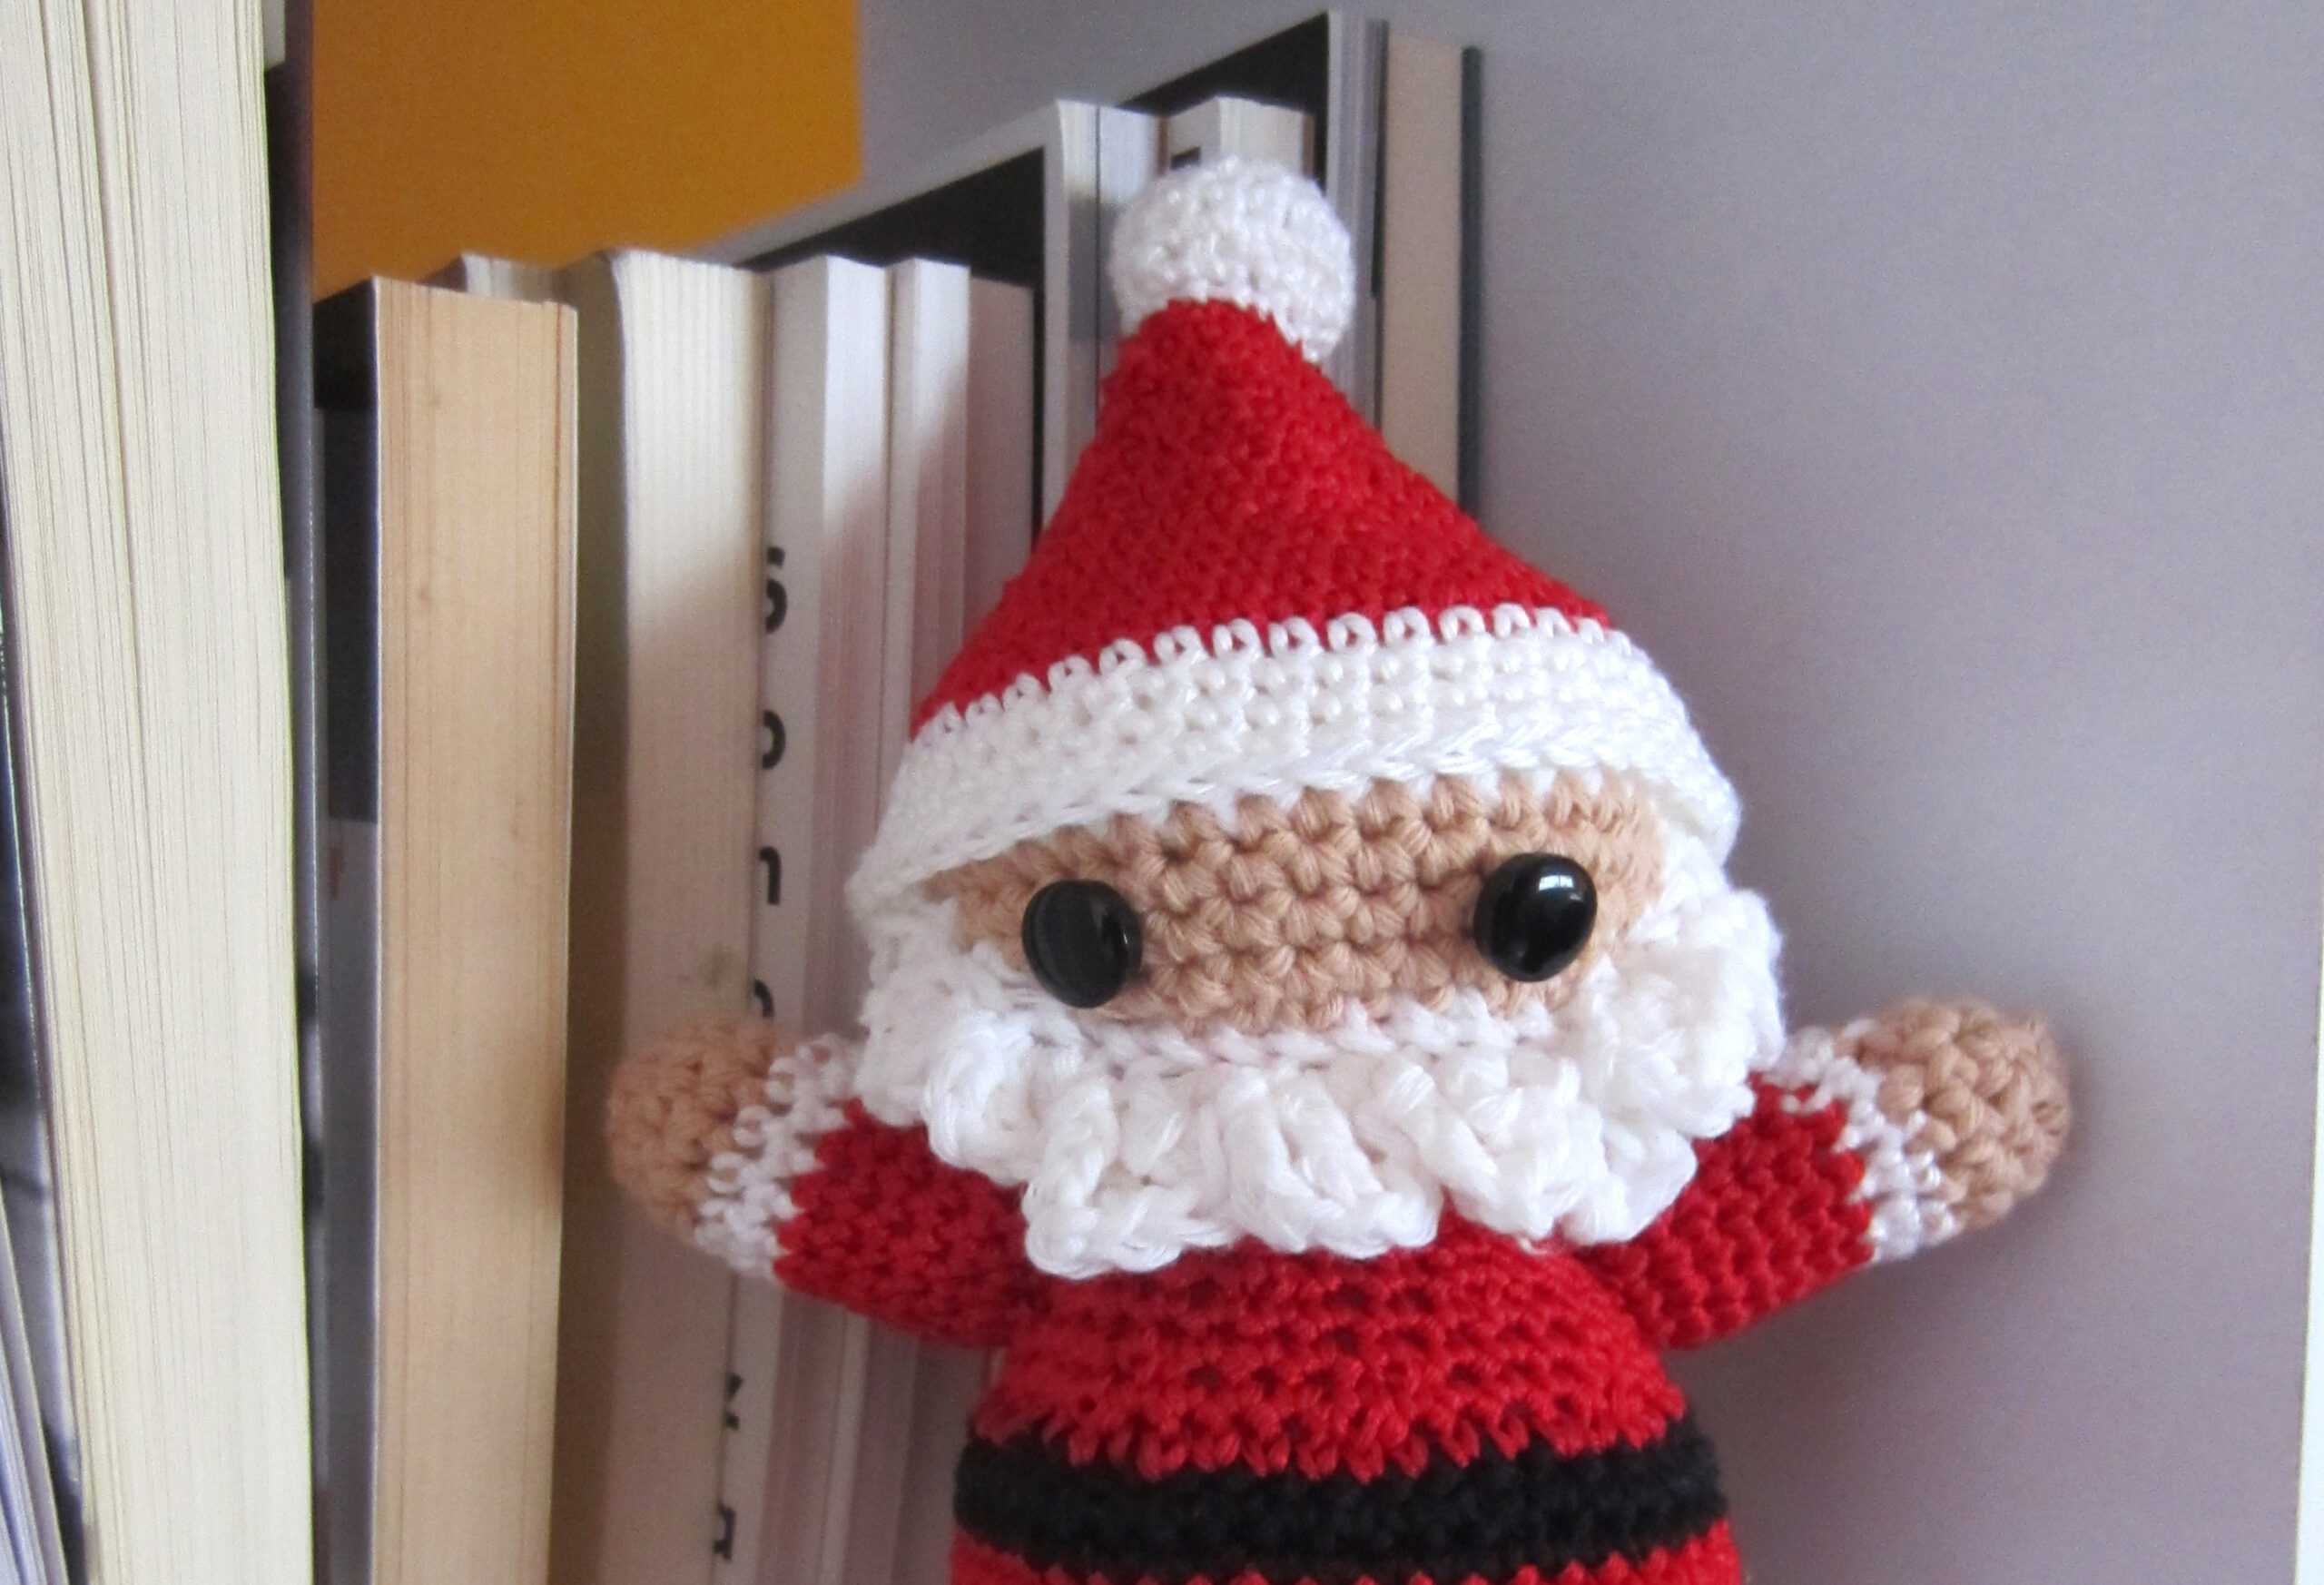
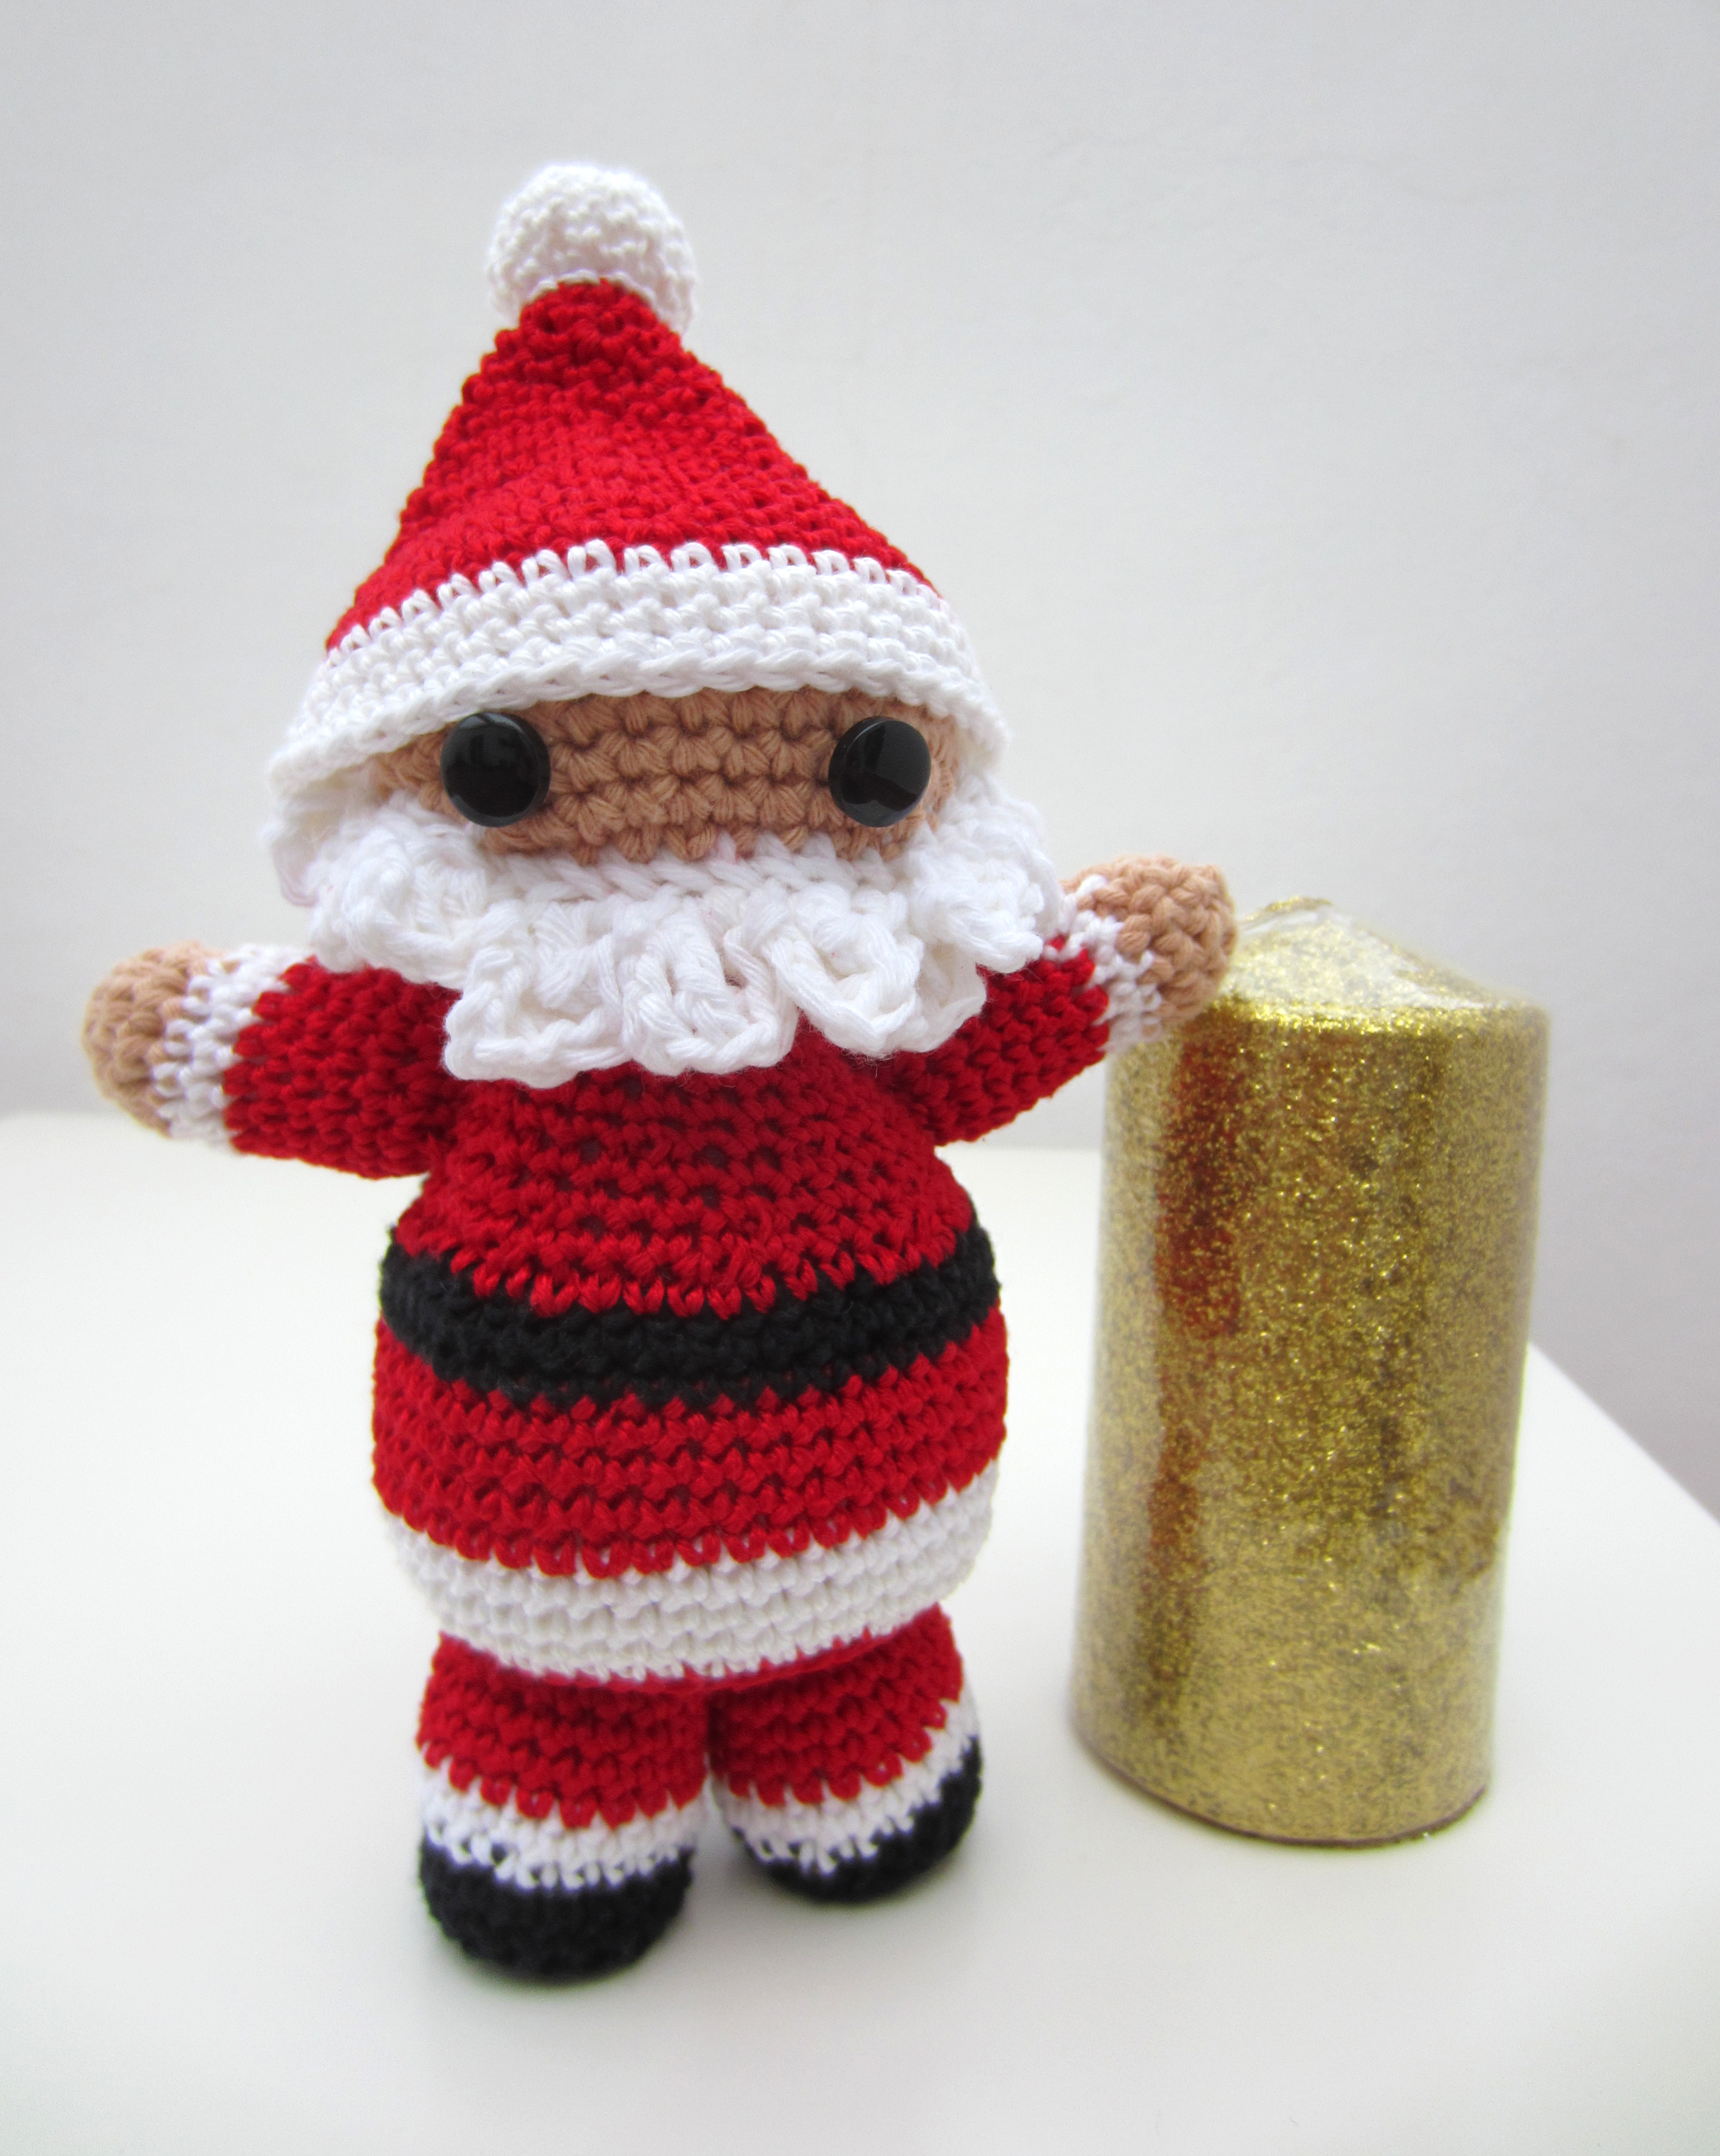
Santa Claus Amigurumi Pattern. It takes very little thread, about 50g in total. I recommend using cotton thread or a mix with cotton for the amigurumis..
We are going to need:
-crochet hook 3,5 o 4.
-Red colored cotton thread, blanco, black and beige. (Of the appropriate thickness for a needle of the 3,5 o 4).
-Two black buttons for eyes.
-Stuffed, I have used wadding.
-Needle for sewing wool.
-Bookmarks.
Achievement:
Cap
We start with the color red, everything at low point (Pb).
V1: magic ring 5 points (5p).
V2: 1 Increase in each point (10p).
V3: Pb throughout the round (10p).
V4: 1 Sc and an increase in the next stitch throughout the round (15p).
V5: Pb throughout the round (15p).
V6: 2 Sc and an increase in the next stitch throughout the round (20p).
V7: Pb throughout the round (20p).
V8: 3 Sc and an increase in the next stitch throughout the round (25p).
V9: Pb throughout the round (25p).
V10: 4 Sc and an increase in the next stitch throughout the round (30p).
V11: Pb throughout the round (30p).
V12: 5 Sc and an increase in the next stitch throughout the round (35p).
V13: Pb throughout the round (35p).
V14: 6 Sc and an increase in the next stitch throughout the round (40p).
V15: Pb throughout the round (40p).
V16: 7 Sc and an increase in the next stitch throughout the round (45p).
Change to white color.
V17-20: Pb throughout the round (45p). At the last point of the turn 20, make a slip stitch to close.
Cap ball
Two options, You can make a small pompom or follow the following pattern:
V1: magic ring 5 points (5p).
V2: 1 Increase in each point (10p).
V3: Pb throughout the round (10p).
V4: 1 Sc and an increase in the next stitch throughout the round (15p).
V5: Pb throughout the round (15p).
V6: 2 Sc and a decrease in the next stitch throughout the round and close with a slip stitch (10p).
head and beard
Start with white.
V1: magic ring 8 points (8p).
V2: 1 Increase in each point (16p).
V3: 1 Sc and an increase in the next stitch throughout the round (24p).
V4: 2 Sc and an increase in the next stitch throughout the round (32p).
V5: 3 Sc and an increase in the next stitch throughout the round (40p).
V6-8: Pb throughout the round (40p).
V9: Pb throughout the round but in this specific order, 12 Pb with white, 16 Pb con beige y 12 Pb with white (40p).
V10: Pb throughout the round but in this specific order, 13 Pb blanco, 14 Pb beige y 13 Pb blanco (40p).
V11: Pb throughout the round but in this specific order, 14 Pb blanco, 12 Pb beige y 14 Pb blanco (40p).
V12: Pb throughout the round but in this specific order, 15 Pb blanco, 10 Pb beige y 15 Pb blanco (40p).
V13: 3 Pb and a decrease in the next stitch throughout the round (32p).
V14: 2 Pb and a decrease in the next stitch throughout the round (24p).
V15: 1 Sc and a decrease in the next stitch throughout the round and close with a slip stitch (16p).
for the beard, We start by making a chain of 22 points.
We punch in the 4th point from the needle and make 2 high points (Pa) in the same point and slip stitch in the next. We continue doing 3 chains, 2 Dc in the next and slip stitch. One more time 3 chains, 2 Dc and slip stitch.
Repeat 4 sometimes this way: We go up with 4 chains, In the next point we do 3 double double crochets and slip stitch in the next.
To finish repeat 3 times the following: We continue doing 3 chain in the next stitch, 2 Dc and slip stitch.
Body
With red thread.
V1: magic ring 8 points (8p).
V2: 1 Increase in each point (16p).
V3: 1 Sc and an increase in the next stitch throughout the round (24p).
V4: 2 Sc and an increase in the next stitch throughout the round (32p).
V5: 3 Sc and an increase in the next stitch throughout the round (40p).
V6: 4 Sc and an increase in the next stitch throughout the round (48p).
Continue knitting with the white color.
V7: Sc throughout the round but only with the inside thread of the chain (48p).
V8-10: Pb throughout the round (48p).
We knit again with the red thread.
V11-14: Pb throughout the round (48p).
We move on to the black thread.
V15-16: Pb throughout the round (48p).
Continue knitting until the end with the red.
V17: 4 Pb and a decrease in the next stitch throughout the round (40p).
V18: 3 Pb and a decrease in the next stitch throughout the round (32p).
V19-20: Pb throughout the round (32p).
V21: 2 Pb and a decrease in the next stitch throughout the round (24p).
V22-23: Pb throughout the round (24p).
V24: Pb and a decrease in the next stitch throughout the round (16p).
V25: Sc throughout the round and finish with a slip stitch (26p).
Arms
Repeat this pattern twice.
Start with the beige thread.
V1: magic ring 5 points (5p).
V2: 1 Increase in each point (10p).
V3: 1 Sc and an increase in the next stitch throughout the round (15p).
V4: Pb throughout the round (15p).
With white thread.
V5-6: Pb throughout the round (15p).
With red thread.
V7-14: Sc throughout the round and close the fabric with slip stitch (15p).
Legs
Repeat this pattern twice.
Start with the black thread.
V1: magic ring 6 points (6p).
V2: 1 Increase in each point (12p).
V3: 1 Sc and an increase in the next stitch throughout the round (18p).
V4-5: Pb throughout the round (18p).
With white thread.
V6: 5 Sc and an increase in the next stitch throughout the round (21p).
V7: Pb throughout the round (21p).
With red thread.
V8-11: Sc throughout the round and finish with a slip stitch (21p).
Mounting
We start by sewing the ball to the hat. Then sew the beard to the head just below the beige color and the buttons aligned in the space of the beige color (what is the face), now we fill the head with wadding. Regarding the hat, You can sew it to the head but I preferred to leave it loose because it fits very well and thus gives me a little play.

To continue we fill the arms, legs and body with the padding so that it is not too tight. And to finish we sew all the parts to the body.


I love!! Thanks for sharing the pattern!! I wish you a Merry Christmas too!
All the best,
Deborah
beautiful, and we wait for the kings!!!!Liliana-
Thank you very much for the pattern, I made it, it turned out very funny, it is my first bigger amigurumi, I'll put the photo on Facebook
Great. Thanks to you!
Thank you for your good heart in sharing. Cheers! Your work is beautiful!
Thanks for sharing it. It's very nice.
Very beautiful work, thanks for sharing.
I love, I'm going to try to do it, thank you so much